Extending MSNoise with Plugins
New in version 1.4.
Starting with MSNoise 1.4, MSNoise supports Plugins, this means the default workflow “from archive to dv/v” can be branched at any step!
What is a Plugin and how to declare it in MSNoise
A plugin is a python package, properly structured, that can be imported from msnoise, i.e. it has to be “installed” like any other python package.
After installing a plugin, its package name must be declared in the
plugins parameter in the configuration. This must be done PER PROJECT.
This configuration field supports a list of plugins, separated by a simple comma
(!no space), e.g. msnoise_amazing,msnoise_plugin101.
Once configured in a project, the plugin should appear when calling the
msnoise plugin command:
$ msnoise plugin

  Usage: msnoise-script.py plugin [OPTIONS] COMMAND [ARGS]...

  Runs a command in a named plugin

Options:
  --help  Show this message and exit.

Commands:
  amazing  Example Amazing Plugin for MSNoise
Plugin minimal structure
A plugin is a python package, so its minimal structure is:
msnoise-amazingplugin
├── __init__.py
├── setup.py
└── msnoise_amazingplugin
    ├── __init__.py
    └── plugin_definition.py
The setup.py declares where the plugin actually hooks into MSNoise:
from setuptools import setup, find_packages

setup(
    name='msnoise_amazing',
    version='0.1a',
    packages=find_packages(),
    include_package_data=True,
    install_requires=['msnoise',
                      'obspy'],
    entry_points = {
        'msnoise.plugins.commands': [
            'amazing = msnoise_amazing.plugin_definition:amazing',
            ],
        },
    author = "Thomas Lecocq & MSNoise dev team",
    author_email = "Thomas.Lecocq@seismology.be",
    description = "An example plugin",
    license = "EUPL-1.1",
    url = "http://www.msnoise.org",
    keywords="amazing seismology"
)
The most important line of this file is the one declaring the amazing entry
point in msnoise.plugins.commands and linking it to the plugin’s
plugin_definition.py file.
The content of plugin_definition.py must then provide at least one
click.Command, or more commonly, one click.Group and
many click.Command.
import click

@click.group()
def amazing():
    """Example Amazing Plugin for MSNoise"""
    pass

@click.command()
def sayhi():
    """A Very Polite Command"""
    print("Hi")

amazing.add_command(sayhi)
This way, once properly installed and activated (declared in the plugins
config), the plugin will be callable from msnoise:
$ msnoise plugin amazing

  Usage: msnoise-script.py plugin amazing [OPTIONS] COMMAND [ARGS]...

  Example Amazing Plugin for MSNoise

Options:
  --help  Show this message and exit.

Commands:
  sayhi  A Very Polite Command
and its command too:
$ msnoise plugin amazing sayhi

Hi
Amazing, isn’t it ?
Declaring Job Types - Hooking
Plugin-based job types are defined by providing a register_job_types method
in plugin_definition.py. A new job type is defined with two parameters:
name: the actual job name (acronym style) used all over (example: CC2, TEST)after: when is this job added to the database.
Current supported “after” are:
new_files: will be created when running thenew_jobscommand and will create a job with those parameters (nf is a new file identified in the scan_archive procedure). In this specific case, thepairfield of the job will only be NET.STA, not a “pair”. A job will only be inserted if the station is “Used” in the configuration.all_jobs.append({"day": current_date, "pair": "%s.%s"%(nf.net,nf.sta), "jobtype": jobtype, "flag": "T", "lastmod": datetime.datetime.utcnow()})
scan_archive: will be created when running thenew_jobscommand, in parallel toCCjobs. This is, for example, useful when one wants to compute relative amplitude ratios between station pairs. In this case, thepairfield of the job is set to the pair name.refstack: will be created when running thestackcommand and when a new REF stack needed to be calculated. This is, for example, useful when one wants to work on the REF stacks using a Ambient Seismic Noise Tomography code.
Plugin’s Job Types are first declared in setup.py (in Entry Points):
'msnoise.plugins.jobtypes': [
'register = msnoise_amazing.plugin_definition:register_job_types',
],
def register_job_types():
    jobtypes = []
    jobtypes.append( {"name":"AMAZ1", "after":"new_files"} )
    return jobtypes
Then, adding a compute command to the plugin_definition.py:
@click.command()
def compute():
    """Compute an Amazing Value"""
    from .compute import main()
    main()

amazing.add_command(compute)
and creating a compute.py file in the plugin folder:
import os
from obspy.core import UTCDateTime, read

from msnoise.api import connect, is_next_job, get_next_job, \
    get_data_availability, get_config, update_job

def main():
    db = connect()
    while is_next_job(db, jobtype='AMAZ1'):
        jobs = get_next_job(db, jobtype='AMAZ1')
        for job in jobs:
            net, sta = job.pair.split('.')
            gd = UTCDateTime(job.day).datetime
            print("Processing %s.%s for day %s"%(net,sta, job.day))
            files = get_data_availability(
                    db, net=net, sta=sta, starttime=gd, endtime=gd,
                    comp="Z")
            for file in files:
                fn = os.path.join(file.path, file.file)
                st = read(fn, starttime=UTCDateTime(job.day), endtime=UTCDateTime(job.day)+86400)
                print(st)
Aaaand:
$ msnoise plugin amazing compute

Processing YA.UV05 for day 2010-09-01
1 Trace(s) in Stream:
YA.UV05.00.HHZ | 2010-09-01T00:00:00.000000Z - 2010-09-01T23:59:59.990000Z | 100.0 Hz, 8640000 samples
Processing YA.UV06 for day 2010-09-01
1 Trace(s) in Stream:
YA.UV06.00.HHZ | 2010-09-01T00:00:00.000000Z - 2010-09-01T23:59:59.990000Z | 100.0 Hz, 8640000 samples
Processing YA.UV10 for day 2010-09-01
1 Trace(s) in Stream:
YA.UV10.00.HHZ | 2010-09-01T00:00:00.000000Z - 2010-09-01T23:59:59.990000Z | 100.0 Hz, 8640000 samples
Provided you have reset the DataAvailability rows with a “M” or “N” flag so that
when you ran new_jobs it actually inserted the AMAZ1 jobs !
Because job-based stuff always requires a lot of trial-and-error, remember that
the msnoise reset command is your best friend. In this example, we would
need to msnoise reset AMAZ1 to reset “I”n Progress jobs, or
msnoise reset AMAZ1 --all to reset all AMAZ1 jobs to “T”o Do.
Note
Currently, not all MSNoise workflow steps use the
is_next_job-get_next_joblogic, but it’ll be the case for MSNoise 1.5Only three hooks are currently present, of course, more will be added in in the future.
Plugin’s own config table
Plugins can create a new table in the database, e.g. in an install command.
First, a amazing_table_def.py table definition file must be created:
# Table definitions for Amazing
from sqlalchemy import Column, String
from sqlalchemy.ext.declarative import declarative_base

Base = declarative_base()


class AmazingConfig(Base):
    """
    Config Object

    :type name: str
    :param name: The name of the config bit to set.

    :type value: str
    :param value: The value of parameter `name`
    """
    __tablename__ = "amazing-config"
    name = Column(String(255), primary_key=True)
    value = Column(String(255))

    def __init__(self, name, value):
        """"""
        self.name = name
        self.value = value
and a default.py file containing the parameters names, explanation and
default value:
from collections import OrderedDict
default = OrderedDict()

default['parameter1'] = ["Some really useful text",'1']
default['parameter2'] = ["Some really useful text",'1']
default['parameter3'] = ["Some really useful text",'1']
default['parameter4'] = ["Some really useful text",'1']

default['question1'] = ["Is this a useful text [Y]/N",'Y']
Then, the install.py file contains the method to add this table to the
database:
from msnoise.api import *

from .amazing_table_def import AmazingConfig
from .default import default

def main():
    engine = get_engine()
    Session = sessionmaker(bind=engine)
    session = Session()

    AmazingConfig.__table__.create(bind=engine, checkfirst=True)
    for name in default.keys():
        session.add(AmazingConfig(name=name,value=default[name][-1]))

    session.commit()
then add the command to the plugin_definition.py:
@click.command()
def install():
    """ Create the Config table"""
    from .install import main
    main()

amazing.add_command(install)
When all this is prepared, running the msnoise plugin amazing install
command will connect to the current database, create the amazing-config table
and add the parameters names and their default value.
An entry point to the setup.py file has to be defined in order to access
Plugin’s config tables via the msnoise api msnoise.api.get_config() method:
'msnoise.plugins.table_def': [
        'AmazingConfig = msnoise_amazing.amazing_table_def:AmazingConfig',
    ],
Then, running a simple python command:
from msnoise.api import connect, get_config

db = connect()
print(get_config(db, "parameter1", plugin="Amazing"))
print(get_config(db, "parameter2", plugin="Amazing"))
print(get_config(db, "parameter3", plugin="Amazing"))
print(get_config(db, "parameter4", plugin="Amazing"))
print(get_config(db, "question1", plugin="Amazing", isbool=True))
should print:
1
1
1
1
True
Adding Web Admin Pages
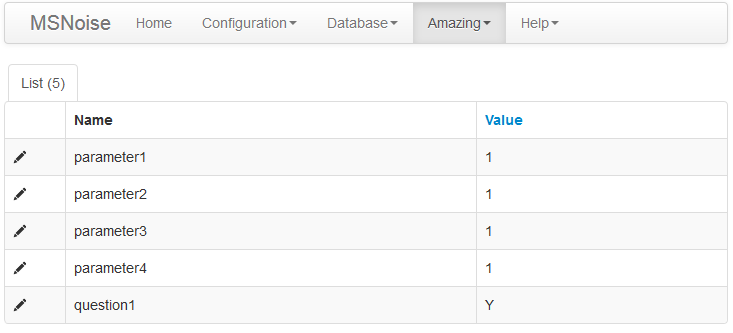
Plugins can also declare new pages to the Web Admin ! This is simply done by,
againg, declaring some entry points in setup.py:
'msnoise.plugins.admin_view': [
        'AmazingConfigView = msnoise_amazing.plugin_definition:AmazingConfigView',
        ],
and the corresponding object in plugin_definition.py:
from flask.ext.admin.contrib.sqla import ModelView
from .amazing_table_def import AmazingConfig


class AmazingConfigView(ModelView):
    # Disable model creation
    view_title = "MSNoise Amazing Configuration"
    name = "Configuration"

    can_create = False
    can_delete = False
    page_size = 50
    # Override displayed fields
    column_list = ('name', 'value')

    def __init__(self, session, **kwargs):
        # You can pass name and other parameters if you want to
        super(AmazingConfigView, self).__init__(AmazingConfig, session,
                                                endpoint="amazingconfig",
                                                name="Config",
                                                category="Amazing", **kwargs)
Then (as always, after re-developing/installing the package), the magic occurs:

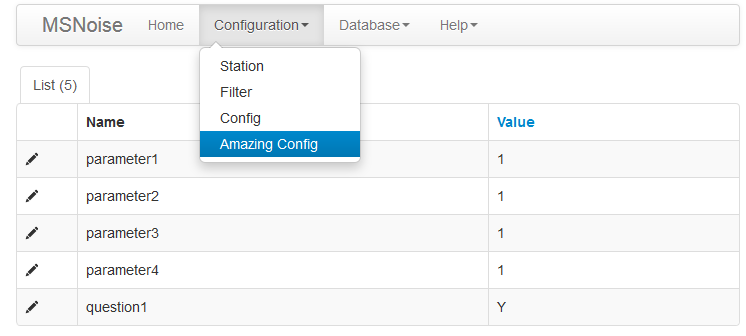
Or, changing the last 4 lines of the previous code to:
super(AmazingConfigView, self).__init__(AmazingConfig, session,
                                        endpoint="amazingconfig",
                                        name="Amazing Config",
                                        category="Configuration", **kwargs)

Uninstalling Plugins
Plugins can be de-activated by removing their package name from the plugins
configuration parameter. Ideally, plugins should provide an uninstall
command similar to the install to take care of deleting/dropping the tables
in the project database.
Download Amazing Plugin
That’s cheating, you know ? :-)